Finite State Machines in JavaScript
Unfortunately I didn’t have a chance to go to this years jQuery UK conference, but a friend was tweeting as it happened and mentioned Doug Neiner’s talk on Machina.js (http://events.jquery.org/2013/uk/schedule.html#doug). This got me looking at the Finite State Machine library and I started to see immediate applications to what I was working on. Machina does lots, but if you just want a simple state machine, there’s an awful lot of code. This led me down the path of building my own smaller Finite State Machine.
Not “Not built here”, honest
Not just a matter of “not built here”, my decision to build my own was mainly down to Machina JS being 5kbs compressed. The fact it included lots of functionality is great for when you want to extend and integrate with a message bus, but in this case I just wanted to have a really simple implementation. What’s more I found it an ideal way to increase my understanding of Finite State Machines.
So why do I even want one?
If you’re familiar with Finite State Machines, you can probably skip this bit. If you’ve not encountered Finite State Machtines, you’ve almost certainly created state within your code.
We often represent state within code without explicitly meaning to. This often takes the form of status booleans, e.g. isClosed or hasLoaded. Keeping track of state this way and managing the values of these flags can become a nightmare to maintain and make it much harder for new programmers to understand your code.
An example of managing state using flags is this expanding block:
var ExpandingBlock;

(function() {
  ExpandingBlock = function(element) {
	var isOpen = true;

	function animationInProgress() {
	  return element.is(':animated');
	}

	function open() {
	  if(!animationInProgress()) {
		element.slideDown({
		  complete: function() {
			isOpen = true;
		  }
		});
	  }
	}

	function close() {
	  if(!animationInProgress()) {
		element.slideUp({
		  complete: function() {
			isOpen = false;
		  }
		});
	  }
	}

	return {
	  open: open,
	  close: close,
	  toggle: function() {
		if(isOpen) {
		   close();
		}
		else{
		  open();
		}
	  }
	};
  };


})();

$(function() {
  var block = new ExpandingBlock($('#block'));

  $('#button-set')
	.on('click', '#open', function() { block.open(); })
	.on('click', '#close', function() { block.close(); })
	.on('click', '#toggle', function() { block.toggle(); });
});
The most obvious state flag in the code is:
if(isOpen) {
   close();
}
else{
  open();
}
This indicates at least two states existing within the code - open and close. However, another if statement indicates yet another two states:
if(!animationInProgress()) { … }
So if we’re currently animating, don’t do anything, which is the case for both opening and closing.

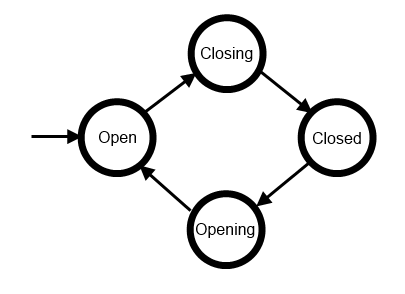
Four states then, Open, Closing, Closed and Opening. And we can transition from open to closing, closing to closed, closed to opening and opening to open. With that identified we can draw our state diagram:
Same functionality, implemented using a Finite State Machine:
var ExpandingBlock;

(function() {
  ExpandingBlock = function(element) {
	var finiteStateMachine = new nano.Machine({
	  states: {
		open: {
		  close: function() {
			this.transitionToState('closing');
		  },
		  toggle: function() {
			this.transitionToState('closing');
		  }
		},
		closing: {
		  _onEnter: function() {
			var machine = this;

			element.slideUp({
			  complete: function() {
				machine.transitionToState('closed');
			  }
			});
		  }
		},
		closed: {
		  open: function() {
			this.transitionToState('opening');
		  },
		  toggle: function() {
			this.transitionToState('opening');
		  }
		},
		opening: {
		  _onEnter: function() {
			var machine = this;

			element.slideDown({
			  complete: function() {
				machine.transitionToState('open');
			  }
			});
		  }
		}
	  },
	  initialState: 'open'
	});

	return {
	  open: function() {
		finiteStateMachine.handle('open');
	  },
	  close: function() {
		finiteStateMachine.handle('close');
	  },
	  toggle: function() {
		finiteStateMachine.handle('toggle');
	  }
	};
  };
})();

$(function() {
  var block = new ExpandingBlock($('#block'));

  $('#button-set')
	.on('click', '#open', function() { block.open(); })
	.on('click', '#close', function() { block.close(); })
	.on('click', '#toggle', function() { block.toggle(); });
});
Instead of boolean flags and if statements, we define the possible states in an object, as well as the initial state (in this case open). Event handlers defined on each state define what events that state will accept. By defining these for each state it allows to not have to check what state we’re in and control the transitions between states. I.e. you can’t go from open to opening. This implementation of Finite State Machines (same as machina.js) supports another event handler - _onEnter. This is automatically called when the state machine enters this state, this allows setting of functionality that will always occur when the machine enters that state, e.g. opening will always cause the block to start the expanding animation.
Using states and event handlers to manage the block’s expanding and collapsing means we don’t need to check if the block is already open or not - it’s either in an open or closed state. Neither do we need to check if an animation is in progress (and exit immediately if it is), in an opening or closing state we don’t listen for any event handlers at all. This removes lot’s of nasty if statements and branching code!
Building nanoMachine.js
Building a Finite State Machine implementation really helped me understand how they can be used, so whether it ends up of being of use to anyone or not, it was a valuable exercise. The final implementation of nanoMachine.js comes in at 310bytes compressed, so if you don’t need all the functionality of machina.js consider using nanoMachine.js.
TL;DR
You can see the source of nanoMachine.js and download the minified version on GitHub